Are you sick and tired to prep nails for polish only to have them chip the moment you have a task to do
It’s worth noting that having a nice polish does not only depend on the application how the nails are prepared definitely makes the difference.
Let’s explore the techniques of nail prep that we have mastered that will make your nails remain as if they have come from the salon for weeks.
The Foundation of Fabulous Nails
Why does nail prep matter so much? There is more than meets the eye; the right preparation is fundamental to nail endurance as well as the endurance of nail polish.
Consider it like preparing the canvas for the artist. You don’t go on painting a wall without putting on a primer coat. Would you?
The holy trinity of nail prep focuses on:
Health: Ensuring your nails are in top condition.
Longevity: Making your polish last longer.
Luster: Getting That Dazzling Shine
When you ace the preparations (intended), you are not only concerned about making your polish pretty but ensuring that it stays on longer and displays.
Types of Nails and their Structure
However, before looking at the details, the anatomy of the nail needs to be explained. Nails are not simply dead keratin, rather they are formed of several parts.
Nail plate: The part of the nail that is visible above the skin surface.
Nail bed: The skin beneath the nail plate
Matrix: Where new nail cells are produced
Cuticle: The protective seal between the skin and nail plate
Understanding these components helps you tailor your prep routine to your unique nail needs. For instance, if you have a thin nail plate, you’ll want to be extra gentle during filing.
Gather Your Arsenal
Every nail prep pro needs the right tools. Here’s your essential toolkit:
| Tool | Purpose | Budget Friendly Alternative |
| Nail polish remover | Removes old polish | DIY vinegar and lemon juice mixture |
| Nail file | Shapes nails | Emery board |
| Cuticle pusher | Manages cuticles | Orange stick |
| Buffer | Smooths nail surface | Fine grit sandpaper |
| Cuticle oil | Hydrates and nourishes | Olive or coconut oil |
| Base coat | Preps for polish | Clear nail polish |
Pro tip: Invest in quality tools where you can. Your nails will thank you!
The Cleanse
First things first let’s get rid of any old polish. The debate between acetone and non acetone removers is ongoing, but here’s the scoop:
- Acetone: Fast acting but can be drying
- Non acetone: Gentler but may require more elbow grease
For stubborn glitters or dark colors, try the foil method:
- Soak a cotton ball in remover
- Place it on your nail
- Wrap with aluminum foil
- Wait 5-10 minutes
- Slide off, taking the polish with it
Shape Shifter
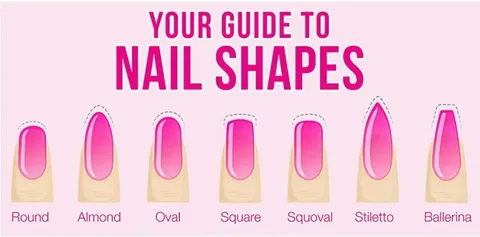
Now that your nails are bare, it’s time to shape up. Your ideal shape depends on your nail bed and personal style. Here are some popular options:
- Round: Classic and low maintenance
- Square: Bold and modern
- Oval: Elegant and elongating
- Squoval: A versatile square oval hybrid
When filing, always move in one direction to prevent splitting. Think of it like petting a cat one way is soothing, back and forth is asking for trouble.
Tame the Beast: Cuticle Care
Cuticles are your nails’ bouncers, keeping bacteria out. Treat them with respect! Here’s how:
- Soak your nails in warm water for 5 minutes
- Apply cuticle oil or remover
- Gently push back cuticles with a pusher or orange stick
- Nip only hangnails, if necessary
The Great Cuticle Debate: To cut or not to cut? Most pros say don’t trimming can lead to infection and uneven regrowth. When in doubt, leave them be.
Buff It Out
Buffing is like exfoliating for your nails. It smooths ridges and creates a clean canvas for polish. But easy does it! Over buffing can thin your nails.
Buffing technique:
- Use a four sided buffer
- Start with the coarsest side
- Work your way to the finest grit
- Finish with the smoothing side for natural shine
Remember: Buff in an X pattern across the nail for even results.
Hydration Station
Moisture is key for healthy nails and polish adherence. But timing is everything you want your nails hydrated, not wet, before polish application.
Try this hydration hack:
- Apply cuticle oil or hand cream
- Let it absorb for 5-10 minutes
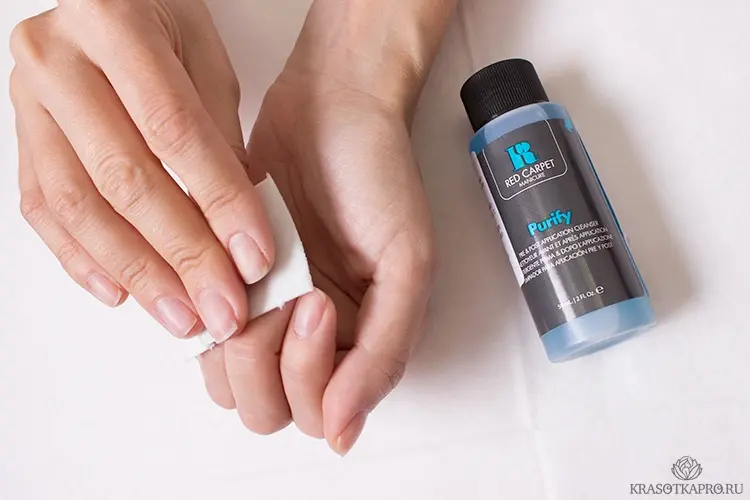
- Wipe nails with nail polish remover to prep for polish
The Final Countdown: Pre Polish Ritual
You’re in the home stretch! These last steps ensure your polish has the best shot at a long, chip free life:
- Swipe each nail with nail polish remover to remove any oils
- Apply a base coat tailored to your nail type:
- Ridge filling for uneven nails
- Strengthening for weak nails
- Sticky for extra polish grip
Pro tip: Extend your base coat slightly over your cuticles and under the free edge to seal your polish in.
Troubleshooting Common Prep Problems
Even the best of us hit nail snags. Here’s how to handle common issues:
- Ridges: Use a ridge filling base coat
- Peeling: Apply a nail hardener before base coat
- Soft nails: Try a protein rich strengthening treatment
When to see a pro: If you notice persistent discoloration, separation, or pain, it’s time for a dermatologist visit.
Polish Like a Pro
Now that your canvas is prepped, let’s talk application:
- Roll the polish bottle between your hands don’t shake (bubbles are the enemy!)
- Wipe one side of the brush on the bottle’s neck
- Start with a thin stripe down the center
- Fill in the sides with two more strokes
For streak free application, let each coat dry before adding the next. Patience is a virtue in nail art!
Wrap It Up: Sealing the Deal
Your top coat is the unsung hero of a lasting manicure. Here’s how to make it count:
- Apply a thin, even layer
- “Wrap” the free edge by swiping horizontally across the tip
- Let it dry completely
Quick dry hack: Dip your nails in ice water for a minute after your top coat sets. The cold helps polish harden faster.
Maintain the Magic
Keep your mani fresh with these daily habits:
- Wear gloves for cleaning and dishwashing
- Apply cuticle oil daily
- Use hand cream after washing your hands
Aim to repeat the full prep nails for polish process every 1-2 weeks, even if you’re not changing your polish.
Case Study: The Two Week Manicure Challenge
Sarah, a busy lawyer, always struggled with chipped polish. She decided to follow this prep routine rigorously for her next manicure. The result?
Her polish lasted a full two weeks without a single chip, even with her hectic schedule. The key? She says it was the thorough prep and daily cuticle oil application.
“I never believed a DIY manicure could last this long. Proper prep changed the game for me!” Sarah
FAQs
1.How often should I prep my nails if I don’t wear polish? Even without polish, a weekly nail care routine keeps your nails healthy. Focus on gentle filing, cuticle care, and moisturizing.
2.Can I use a regular file instead of a glass file? While regular files work, glass files are gentler and more precise.
This also means that there will be less frequent nail preparation which is an added advantage especially for those who do their nails a lot.
3.If I’m using a 2-in-1 polish, do I still have to apply a base coat? Yes, one still needs to apply a base coat. It is an extension that creates much better grip and a protective layer over the nails as opposed to a two in one product.
4.Can I do something to my nails, so that they do not turn yellow after a lot of polish wear? Always put on a base coat, and periodic cessation of using a polish would be advisable. You may also consider a light buffing or a whitening treatment during such periods.
5.How to best prepare nails at home before doing gel polish? The prep process is about the same however you have to focus on the dehydration of the nail plate even more. For best results, apply a pH balancing solution or rubbing alcohol for the nail plate before the application of the base coat.
Conclusion
Nail preparation for application of polish is not merely a pre manicure chore rather it is a form of self care activity that has great benefits for the health of nails and the durability of nail polish.
By taking these steps and making nail prep a habit, you will be on your way to manicures that are not only done in the salon, but also last.
And remember, a perfect polish is possible only when the dressing up stage is done perfectly.
So take your time, treat your nails with care, and watch as your manicures transform from fleeting to fabulous. Happy polishing!


